This year I am going to test different ways to grow tomatoes to determine what the best ways to grow tomatoes is. I will document the growth of the plant, production, length of season, and taste of the tomato to help you grow the best tomatoes.
I will be using different organic fertilizers and tracking the progress of each plant to see which ones are best for growing tomatoes.
I am also trying different structures and growing techniques to see which produces more tomatoes I will document this for you.
No matter how you grow your tomatoes you should always plant them in a sunny spot that receives 8-10 hours of direct sunlight.
See updates at the bottom of this page on results for the string method and different fertilizers used.
Tomatoes that I will be testing with the string method
I will update this posting with photographs and documentation of growth, production, and issues with each plant for you and me to learn from for future gardening of tomatoes.
Jubilee- Using COF fertilizer
Prairie Fire- Using Tomato Tone with a little AG Lime added
Genuwine- Usings COF fertilizer
Bloody Butcher- Using Tomato Tone with a little AG Lime added
Pineapple- Using COF
Yellow Boy- Using COF
Big Beef- Using COF
Starting Tomatoes from Seeds
Once you have selected your favorite tomato varieties to grow you will need the following items to grow the tomato seeds.
Containers- This can be any plastic repurposed container you have around the house as long as it is 2-3 inches across and 3-6 inches tall, such as a yogurt or sour cream container, or a solo cup. you can also use other garden containers for seeds either the pots that decompose over time or the plastic or silicone pots.
Potting Mix- I recommend using one of these organic mixes. Black Gold, Jiffy, or any other organic indoor/outdoor potting mix.
Heat Mat
Tray to allow containers to drain into
Dome for the tray
Steps to plant seeds
Punch holes in the bottom of containers if they do not have several to allow good drainage.
Fill the container with potting mix halfway with potting mix. Be sure to moisten the potting mix so that the seeds can germinate.
place 2 seeds in each container pushing them 1/4 an inch into the soil and cover. This is to ensure you get at least one seed germinating.
Place a heat mat under the tray holding the containers to speed up the germination process. Once they have germinated remove the heat mat, they will no longer need the heat from the mat.
Use a humidity dome to retain the moisture in the tray of seeds to promote germination. Once they have germinated remove the dome, they will no longer need the dome on them.
By using the humidity dome and heat mat your seeds may germinate after 4 days otherwise it may take 10-14 days for them to germinate.
Water the seeds from the bottom by placing water in the tray allowing the seeds to absorb up through the bottom of the container for a few hours. After a few hours drain the water off, the seeds do not like to stay wet all the time.
What to do once the seeds sprout
Once the seeds sprout you will need to either provide direct sunlight for at least 6 hours on a window sill or you will need to have them under grow lights for 12-16 hours per day.
If both seeds germinate you will need to either clip one off allowing one to continue to grow or carefully pull each out once they are a little larger to separate and repot individually. Wait until the true leaves appear on the plants, they look like tomato leaves and are the 2nd set of leaves that appear on the plant.
Once the plants have produced the 2nd set of leaves known as true leave you can start to fertilize with a 1/2 strength of liquid fertilizer like Neptunes Harvest Fish and Seaweed.
You can continue to feed them every 10-14 days to provide needed nutrients to grow super strong tomato plants that will be planted in your garden.
Allow the tomato plants to continue to grow until they reach the top of the pot/cup, at this point fill the container with potting mix leaving just the top 3/4 inch unfilled. This will allow you to strengthen the plant by developing roots all along the plant stem.
As the tomatoes grow you will need to raise the light keeping it above the top of the plants.
Fertilizers
First of all, each of these is organic fertilizer for you to use on your tomatoes, some are ready mixed and ready to use others will be a blend that you will put together (COF), and lastly, I will blend a few to see how the mix works.
Tomato plants are heavy feeders that should be fed every 10-14 days throughout the growing season.
My goal is to provide you with the best organic mix to promote the best tasting and most fruit you can produce in your garden.
Tomato Tone
This is a fertilizer that can be purchased at most garden centers or online and is easy to use.
3-4-6 and what this means, 3 stands for Nitrogen, 4 is Phosphate, and 6 = Potash in the fertilizer.
To use this when planting the tomato you should mix 3 Tablespoons in the hole before placing the plant in the hole. Apply again after 10-14 days by side-dressing with 3 Tablespoons per plant and continue doing this every 2-3 weeks throughout the season, water in after applying.
I have planted several plants using this technique to document the results, I will post the results throughout the growing season in this article for you to view.
Rock Phosphate
I am using a Down To Earth product but you can use one that you have access to if you do not have a Down To Earth store near you.
AG Lime
AG Lime will help raise the PH of the soil and give vegetable plants healthier soil to grow in producing stronger plants and better production.
COF Mix
7-7-2 Down to Earth Bio Fish Mix 4 cups
Aglime 1/3 cup
Gypsum 1/3 cup
1 small handful is added to each hole when planting vegetables.
Plant Preparation
When you are ready to plant your tomato in the garden the first thing to do and yes I know this will be difficult emotionally to do is to trim off the lower leaves leaving only the top half leaves on the tomato. The reason for doing this I will explain later in the planting process.
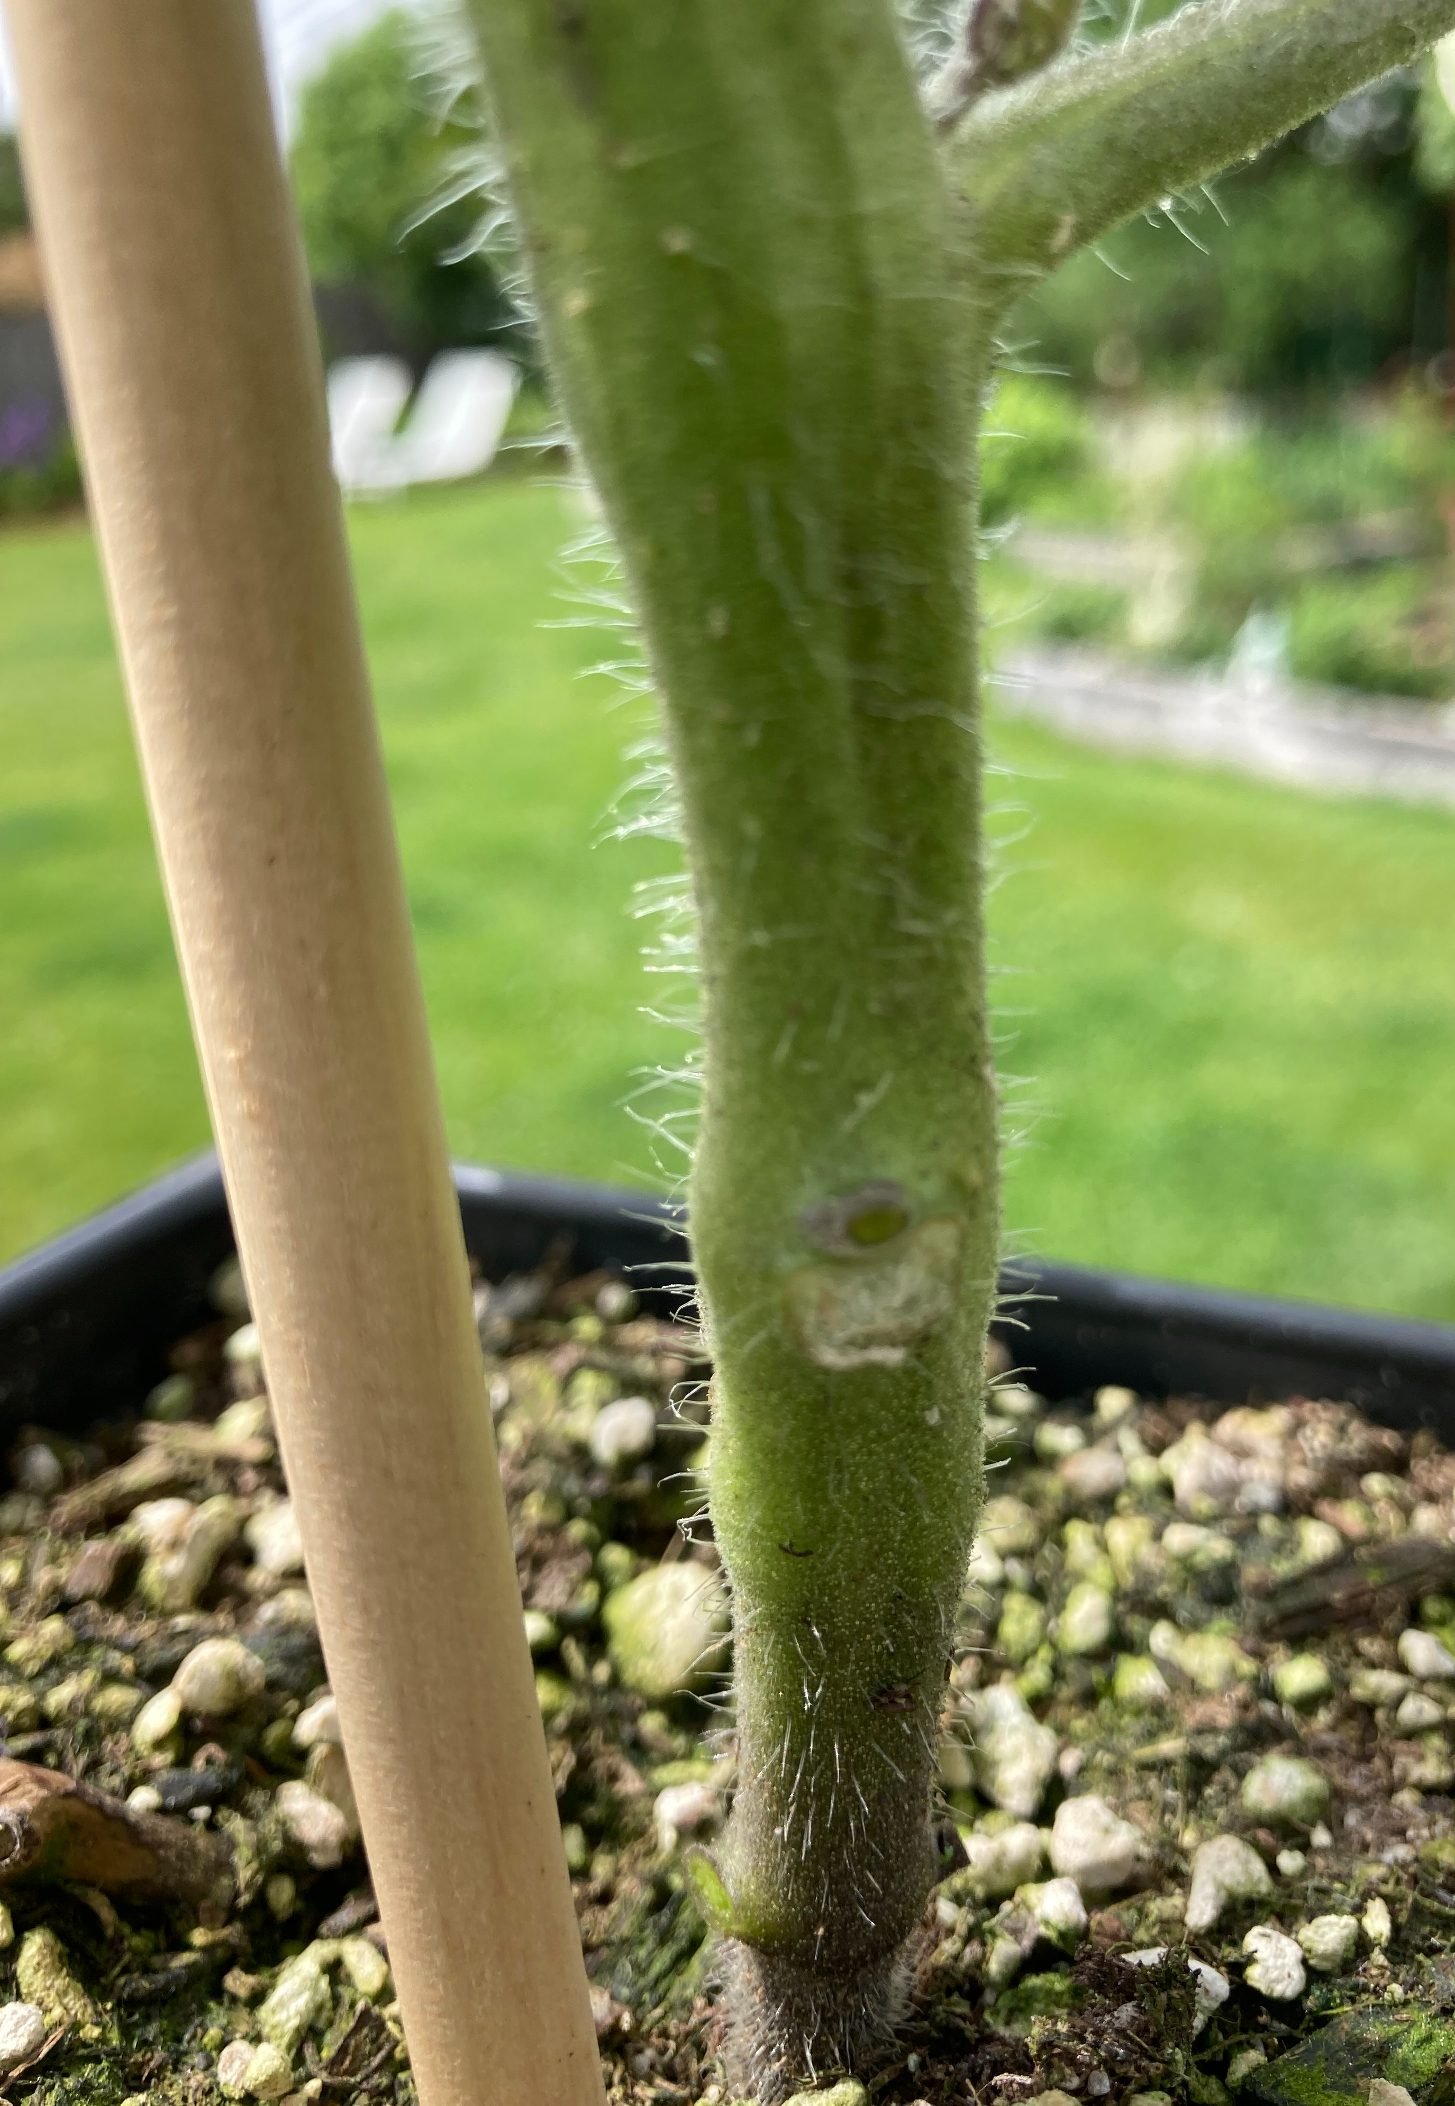
You will notice little hair-like follicles along the stem which will produce roots, as you can see in the picture the hairs are prolific on the stem and when you bury the plant deeper these will all become roots that will help the plant grow and produce more tomatoes.
If your plant is 8-12 inches tall you can strip off the lower 6 inches of branches to bury the plant and produce more roots.
Plant your tomato deep so that it will develop roots all along the stem that is now buried.
Hole Preparation
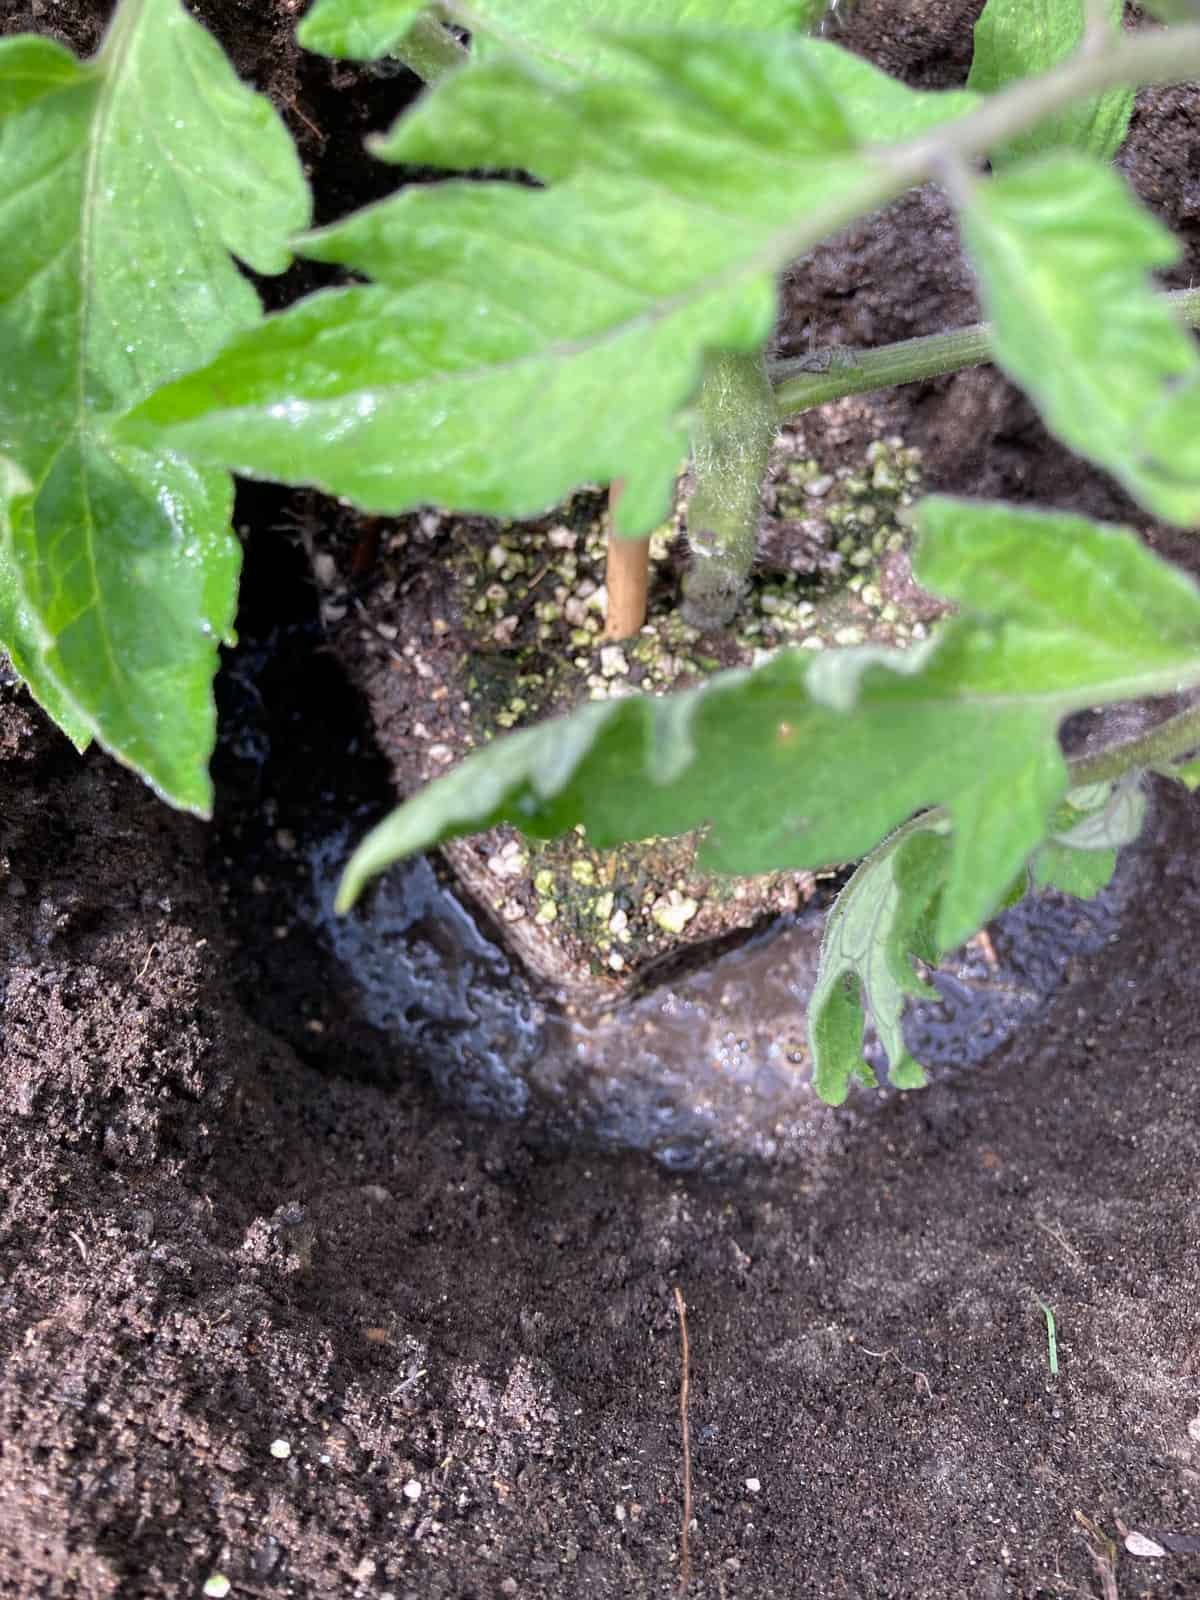
The hole needs to be deep enough to allow the plant to be covered all the way up to the lowest branches covering the stem where you trimmed off the lower branches.
The next step is to fill the hole with water to muck in the tomato to ease the transition to being planted in your garden.
Add your fertilizer to the bottom of the hole and mix it into the soil before placing your plant in the hole.
Planting the Tomato
Make sure you find a sunny location that receives 8 hours of sunlight in your garden to plant the tomatoes.
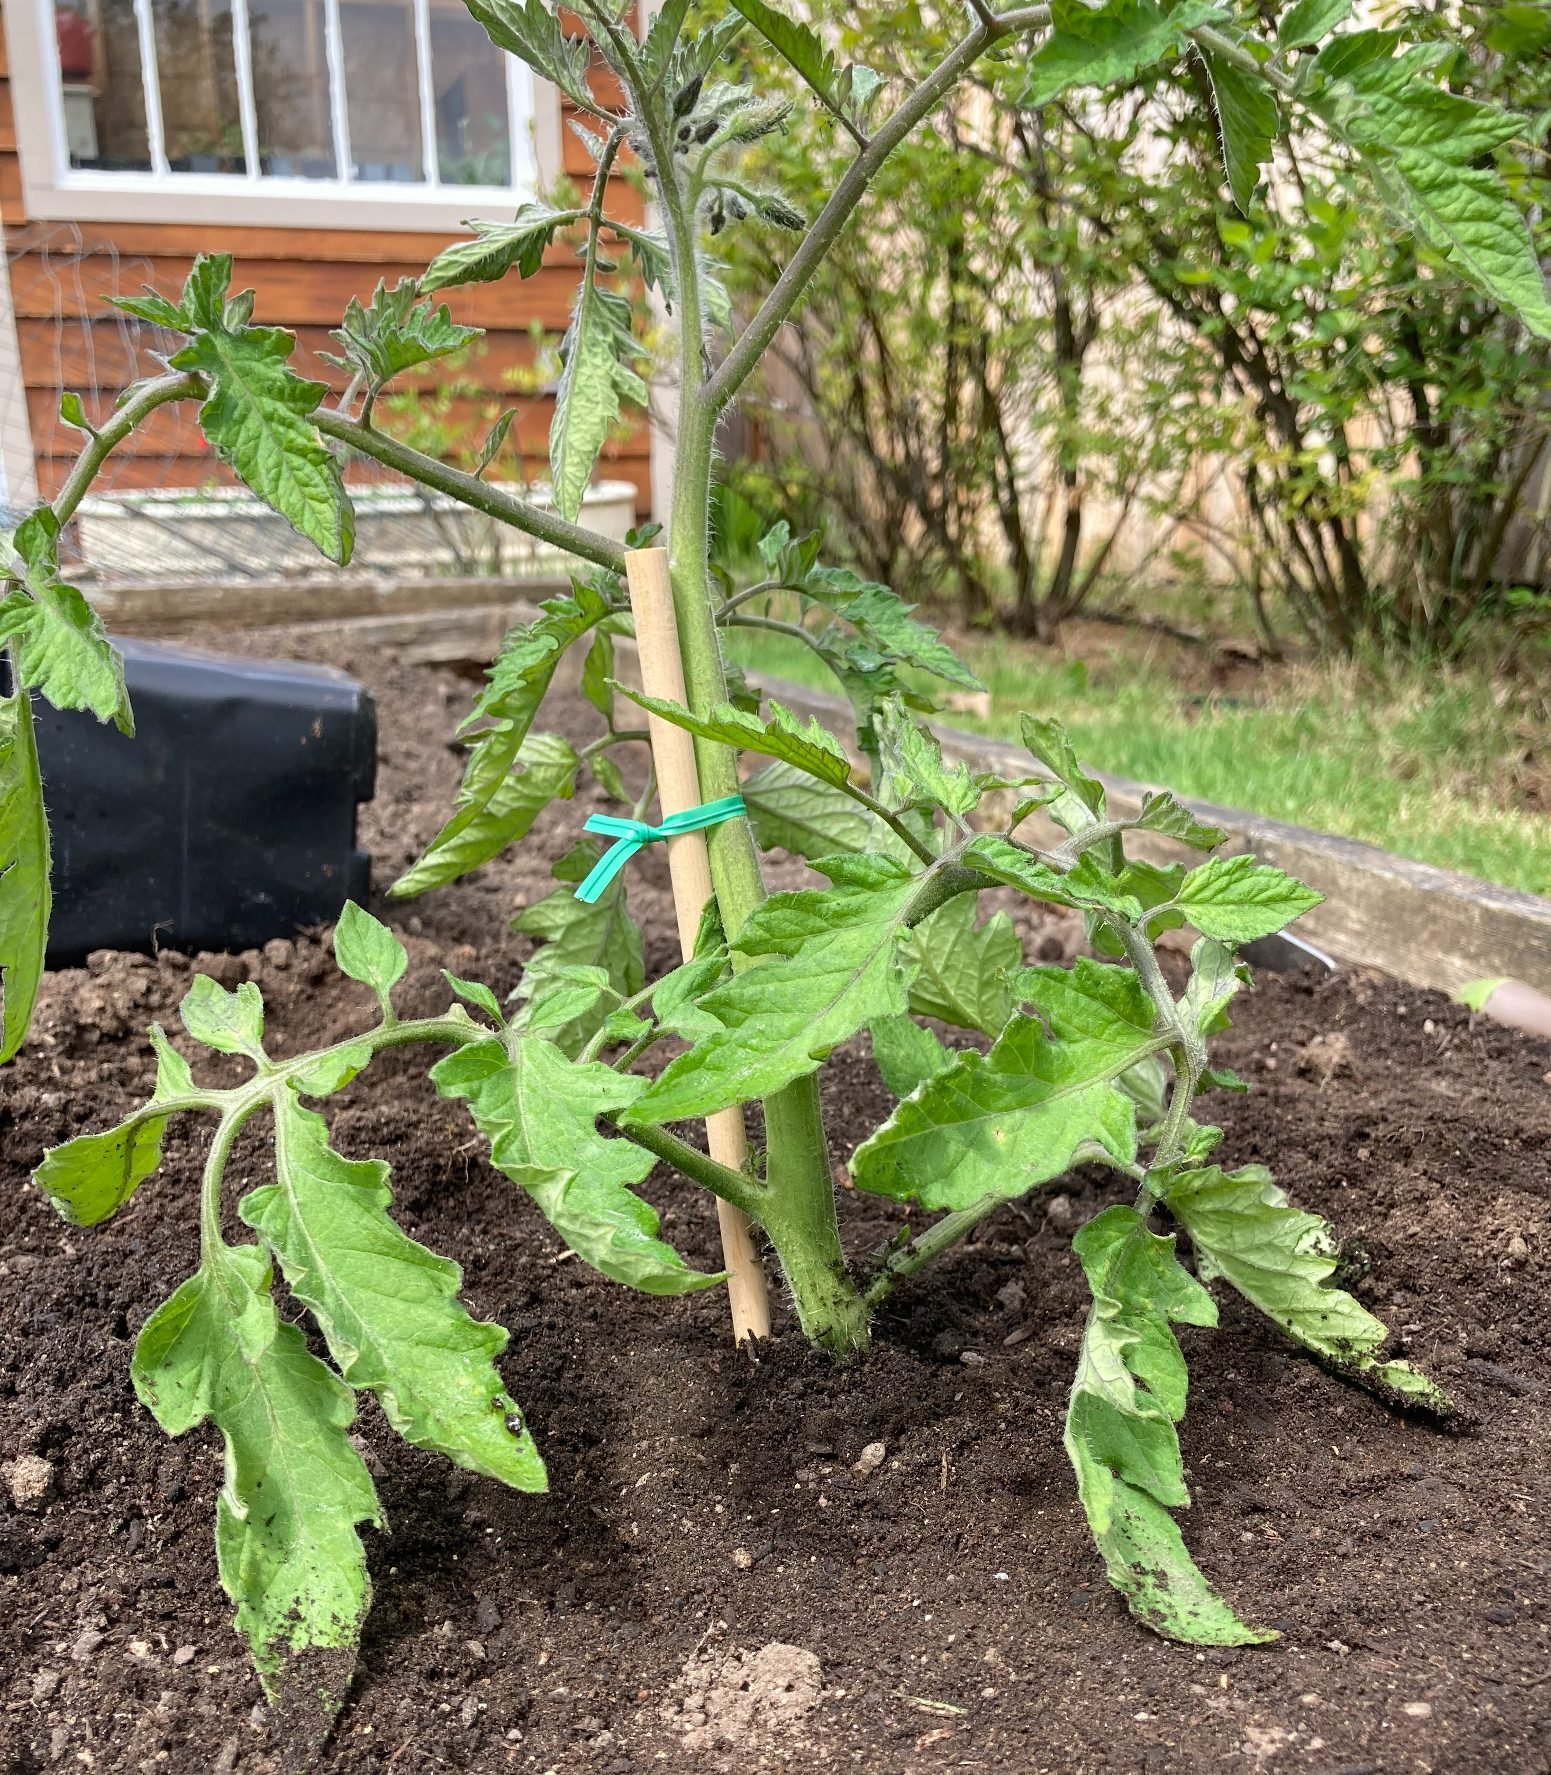
Place the plant in the hole and back-fill with soil to the depth of the lowest stems. All of those hairs on the main stem will now root giving your plant a strong root system to grow a strong plant producing lots of fruit.
Water in again to make sure the roots are moistened and ready to start growing.
The last step is to stake the plant so that you do not damage roots that will spread out and grow which can harm your plant and the production of fruit.
There are many ways to support the plant and I will explain each of them and their benefits.
The tie on this plant attaching the stake to the plant is not a good method since it does not allow the plant to grow so I removed it once I had the tomato planted.
Mulching your Tomato
It is critical to mulch the tomato plants to keep the roots cool from that late summer heat and to reduce the evaporation of the water you have provided your plant.
You can use many materials to mulch your plant, such as wood chips or bark-o-mulch, grass clippings, larger rocks, and mint mulch is also good to provide nutrients as well as good protection for the roots.
Be careful using grass clippings since if this is a thick mass of grass clippings it can compact and actually prevent moisture from penetrating the grass to get water to the roots.
Staking and Supporting Tomato
It is critical to support your tomato for several reasons first and foremost your plant will have lots of fruit which weighs the plant down and the last thing you want to see is branches broken due to the weight of the fruit not being supported.
It is also critical to stake your plant as soon after planting as possible since you do not want to disturb or damage the roots when placing your stakes and cages around the plant.
Tomato Cages- These work but most tomato plants will grow too large to only be supported by the cages especially, the indeterminate plants. To improve the cage support I recommend and use one or two longer stakes to support the cages that can be driven deeper into the ground.
Metal Collapsible Tomato Cage- These cages are great since they are larger to support your tomatoes and can be folded flat and stored for winter. They will need longer stakes driven in to support the cages.
Fencing Material- This can be used to encircle your tomato with two large wood or metal stakes to support the cage you have made. Be sure to use fencing that has large enough holes for you to fit your hand in to retrieve ripe tomatoes.
Wooden Cage- These can be made with 3 or 4 flat panels to enclose the tomato with longer wood stakes to be driven deep into the ground for support. The nice feature is that they can be laid flat for storage during the winter and do not take up much space.
String Support- This is a new technique for me to test and I will be detailing how it works and provide pictures at the end of this article.
The string support method of growing tomatoes is used on indeterminate varieties.
This method will reduce diseases by removing lower leaves and branches that come into contact with the ground, allowing better airflow around the tomato, and allowing the tomato to grow much taller producing more fruit, and will allow you to plant tomatoes closer together.
To grow tomatoes this way you will need to build a structure to allow the tomatoes to grow up the string (See pictures of my temporary structure), until I prove this method works I do not want a permanent structure.
You will need garden twine or tomato string, tomato clips, and a support structure to grow tomatoes this way.
Plant tomatoes as you normally would but closer together 2 feet apart.
Once the plant is about 1-2 feet tall you can remove the lower branches that would come into contact with the ground.
You want 2-3 main stems to allow them to grow and be supported by the string support, the other suckers should be removed.
As they grow up the string clip the tomato clips to the string to support the tomato branch.
See my documentation of the string growth method throughout the year, I have a list at the beginning of this post of the different tomatoes I will be testing and the fertilizers I have used.
Watering
This is one of the most critical areas for producing large plants and lots of fruit that is disease-free.
Tomatoes typically need one inch of water per week and they need consistent watering. The best way to do this is to water twice a week to equal 1 inch of water.
The best way to water tomatoes is through a drip system that applies the water to the roots and not the leaves providing 1 inch of water.
The next best is to water by hand but again not on the leaves or by a sprinkler that will spray the plants. When watering by hand you need to run the water very slowly so that it can be absorbed deep into the ground for the roots.
The reason for not watering the leaves is to reduce the chance of diseases such as mildew which will harm your plant. You do not want water splashing on the leaves which will cause bacteria to develop on the plant.
Tomatoes and all of your garden are best watered in the morning to allow the water to be absorbed by the plant and not evaporate from the heat of the sun.
You can test for the need to water by sticking your finger 2-3 inches deep in the soil if it is moist the plant does not need water.
Do not water just because you see your plant wilt in the heat of the late afternoon sun as I had done early on in my gardening career, this will only harm your plant and potentially produce blossom end rot on your fruit.
Preventing Blossom Drop
Blossom drop is usually caused by excessive heat over 90 degrees for several days, to reduce the heat you can use shade cloth over the plants which will help to reduce the temperature and reduce blossom drop.
Once the temperature returns to below 90 degrees blossoms will set on again and fruit will set on as well.
Pollinating Tomatoes
As much as we want our plants to be pollinated by pollinators like bees and other good insects, we cannot depend on this alone since they have been decimated by the chemicals in our environment.
To help pollinate you can shake the branches to pollinate the plants and you can use a small paint brush or Q-tip to brush across each bud to release the pollen.
Best Ways to Grow Tomatoes Through Feeding
During the growth phase of your tomato, they need nitrogen to promote plant growth if you have given your plant good soil and used one of our earlier fertilizers mentioned you should be good to continue to use these every two weeks for the early growth of the plant. Also, you can use bone or blood meal to increase nitrogen in your soil.
During the fruiting phase of your tomato, they need Potassium and this can be obtained by feeding your plant kelp meal or another fertilizer high in potassium. Tomato-tone fertilizer is well-balanced for feeding your tomato throughout the year.
COF with added Kelp Meal can be used every two weeks throughout the growing season.
Pruning Tomatoes
It is critical to remove suckers on your tomatoes to get more fruit, these are the branches that grow between the main stem and the leaf stem in the crotch of the plant. Also, you need to remove the lower stems to keep bacteria from splashing up on the leaves which causes disease to the plant.
Remove stems to allow good airflow through the plant, you should be able to stick your hand through the plant. Tomatoes need airflow and sunlight to reach the fruit to ripen the fruit and prevent diseases.
Harvesting Tomatoes
You can harvest tomatoes before they are completely ripe since they will continue to ripen but I think it is best to harvest when they are ripe to eat within a few days and best eaten the same day.
Tomatoes should not be refrigerated after harvesting but should be stored on the counter with the top side of the tomato placed down to prevent bruising and it will allow continued ripening.
Results of Best Ways to Grow Tomatoes
As far as growing tomatoes using the string method, I was not completely sold on the method even though I was able to grow more tomato plants in the area I planted using the string method I did not get a larger crop.
Some of this may have been from the area not getting as much sunlight as the other areas I planted tomatoes in so I will test again this next year in a comparable location.
I did not have any issues with blossom end rot but I did have problems with rats climbing the plants and eating both green and red tomatoes even though I used traps around them.
The two fertilizers I used both worked well COF and Tomato Tone, none of the plants fertilized with these fertilizers had any issues with blossom end rot. I do believe the ones with COF had more tomatoes.
The process of planting the tomato deeply allowing more roots to support the plant and mucking in the plant at the time of planting worked well with this tomato shown in the picture producing a huge plant with over 120 Celebrity Tomatoes on this one plant.
I also want to try to use the string method for growing cucumbers to see the results.
I will continue to test this method to see if I get better results.
I hope that you learned the best ways to grow tomatoes so that you can try one or several of them. See my list of favorite tomatoes by going to my link or everything about tomatoes for more information.
Now that you have several different ways to grow the best tomatoes it is time for you to get started on your tomato adventure.
Happy Tomato growing from the Urban Gardener and be sure to check back to see updates throughout the year on the string method for growing tomatoes.

